How to hang salon style? Plan, improv and have fun
 Salon Style invokes the tradition of 17th century Paris when the Royal Academy of Art shared the works of its students with other artists, patrons and the public.
In order to fit as many works in as possible, paintings were hung from floor to ceiling in a marvelous array.
The tradition continued when the exhibition was moved to the Louvre in the mid 1700s and has been sustained since that time — and for a good reason.
Why do it?
Beyond the obvious advantage of economy of space, salon style groupings offer the collector to use his/her own creativity in presenting the collection. This can lead to unexpected, fresh and newly discovered interpretations of themes running through the collection (such as portraiture, historic imagery), as well as lend a cohesiveness to the collection.
How to do it?
There are as many opinions on how to group artworks as there are on the artworks themselves, and I love how the arrays frequently mirror our clients’ personalities.
Whether you gravitate toward a highly regulated, controlled grid of black and white photography or toward an “all over” haphazard mix of eclectic sizes, styles and palette, cohesion is most simply achieved by at least one unifying factor.
- This could be the defined “visual space” within which all works are hung ( such as an imaginary “box” on the wall).
- It could be the type of work (for example children’s drawings). It could be that all works are framed in a similar fashion.
How to instill variety?
Salon style hangs invite variety by their very nature. While colors, dimensions, textures need to be in harmony in the macro sense, they will create delightful variety for the eye. Composition is more intuitive than you think!

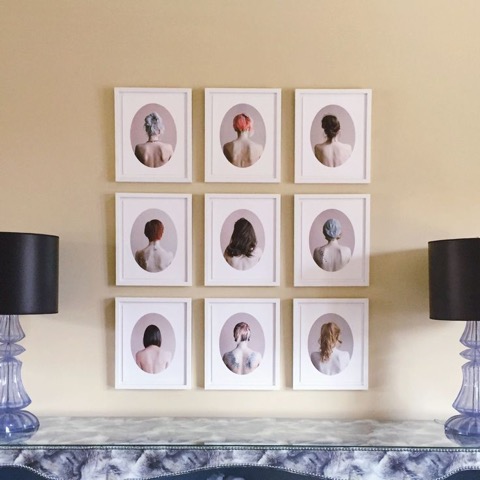
Artist Tara Bogart series “A Modern Hair Study” installed salon-style by the Weingarten Art Group.
I typically avoid grids unless I am hanging several works by the same artists that are each of the same dimension. Some of the most delightful compositions involve the high and the low — fine art and flea market finds.
How to get started?
It can be overwhelming staring at an empty wall and anywhere from five to 25 unhung artworks.
First, I always clear the floor space in front of the wall and lay down a sizable, clean blanket or cloth. I typically map out onto the cloth the dimensions of my “ imaginary box” (with blue painters tape at the corners) from the wall.
Then I begin to improvise.
I usually begin with the largest dimension works first to anchor the grouping. I then move to the smaller works that may have unusual shapes, highly vibrant colors or eye-catching textures — “standouts” to which most eyes will be drawn — and intersperse them in the grouping.
Then I fill in with the rest.
Typically, close spacing (no more than 2-4 inches in between, if even that) will be optimal. You will be surprised as you progress that some of the decisions begin to reveal themselves without much effort at all!
Frequently, a work that you were convinced would be a critical part of the grouping will not fit at all and is better left hung by itself in another location.
The opposite is just as often true.